Interface Layout
You will notice Houdini's user interface puts lots of emphasis on the need to navigate complex scenes given it is a non-linear workflow you will also notice there are a few new ways to manipulate your objects and panels to understand what is going on.
Like every single DCC application, Houdini’s structure consists on a viewport, a working area and parameters area where you can tweak the your selection available data.
The main difference is that the working area is not an outliner or hierarchical represenatation of the scene, but rather a graphical represenatation of it and the varoius contexts availalbe (more on that later) produce variations of this working area.
Components
These are the main components of the interface;
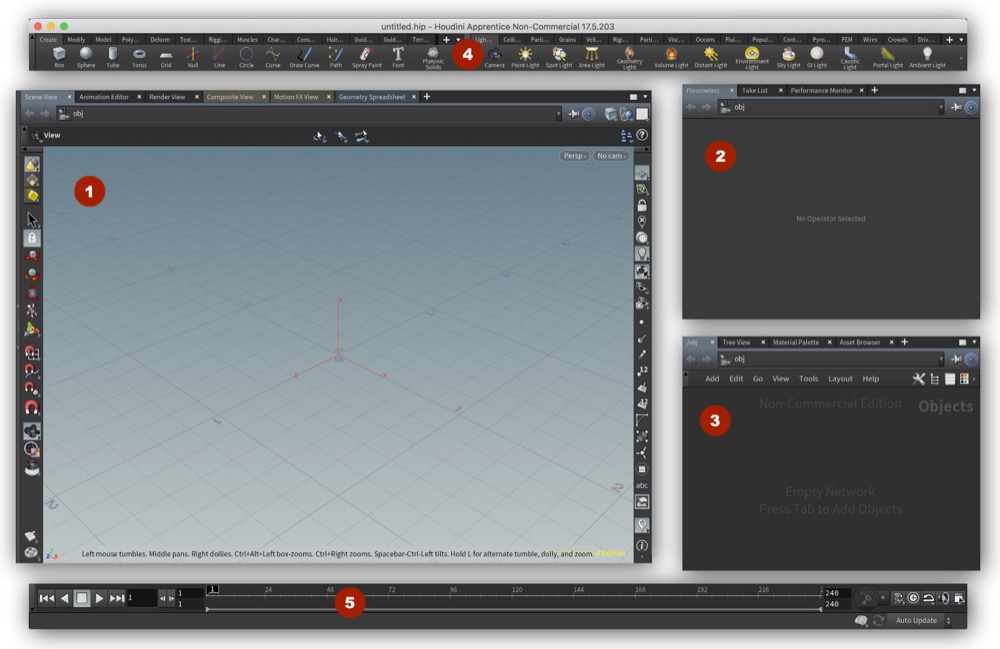
1 - Viewport aka Scene View
As with other 3D tools this is the space you interact with your objects in a direct way, more so in the latest versions as Side Effects have been putting a ton of effort to bring a version of Houdini to market that is more user friendly and therefore, more viewport centric.
For this reason, expect to use the common tool you have on other packages in the form of manipulators, snapping, construction planes, etc…
Your viewport’s workflow is no substitute for working on the network view but certainly is going to be extremely helpful with the use of radial menus.
2 - Working area aka Network View
The working area is where you organise your scene, in the past all the operations were done here so it is highly polished and it is the main powerhouse. There is no real set order so you are pretty much free to have scenes that are easy to read and maintain or truly hard to maintain, up to you. My suggestion is, be tidy or you will pay for it later on.
Make sure you find a compromise with your team as working using different styles can become an unnecessary burden.
3 - Parameter area aka Parameter View
This is the area that displays the parameters of whatever node you select, independetly of the context used. Remember that for practical reason, these parameters shown to you are really a subset of the parameters available so if you miss something, chances are it exists but simply has not been exposed.
4 - Prebundle tools aka Shelf Tools
SideFX provides a bunch of conveniently pre-packaged scripts to accelerate configuration of some tools and fast setups. These are very valuable, specially to learn.
5 - Timeline Tools
The timeline tools are very similar to the ones found on any other package, and yes, you will find keyframe manipulations tools in there as well as SideFX have been revamping it recenctly and expanding the functionality of an already very good timeline.
Explore the timeline tools carefully, they are far more powerful that you may think at first and close to Maya’s ones too.
Configuration
As you can see you have a few more panels and tools to use and you can configure your own desktop so you feel more at home. In my particular case looks like this;
In my paricular case I use Phil Spicer desktop that offers more than purely aesthetic benefits but promotes the correct workflow across the software.
Other Panels
These are the main pannels but we should be very aware there are some very important ones you should pay attention to, in particular I want to point you to these;
- Geometry spreadsheet
- This panel allows you to inspect the geometry and all the attributes that are stored in its various entities. Vertices, polygons, the object itself, etc.. can have attributes and manipulating them is the bread and butter of Houdini so make sure you open this and play with it.
- Data tree
- This is a modern way to look at object, lights and data so you can manipulate them without having to go inside their networks every single time. You will find this extremely useful when you work on lighting.
- Render View
- This view is similar to the Maya IPR.
- Render Scheduler
- This panel allows you to keep track of what is being processed at the moment as you can have multiple renders in parallel and you may want to manage them.
- Bundles
- The bundles view is a strange oddity in Houdini because it is not very procedural at all but it is a fantastic way to group objects and abstract them from using them. Very handy for rendering workflows.
 16 April 2019
 Edit this page